Manage Purchase Orders
Manage Purchase Orders is used to create, view, edit, and delete POs.
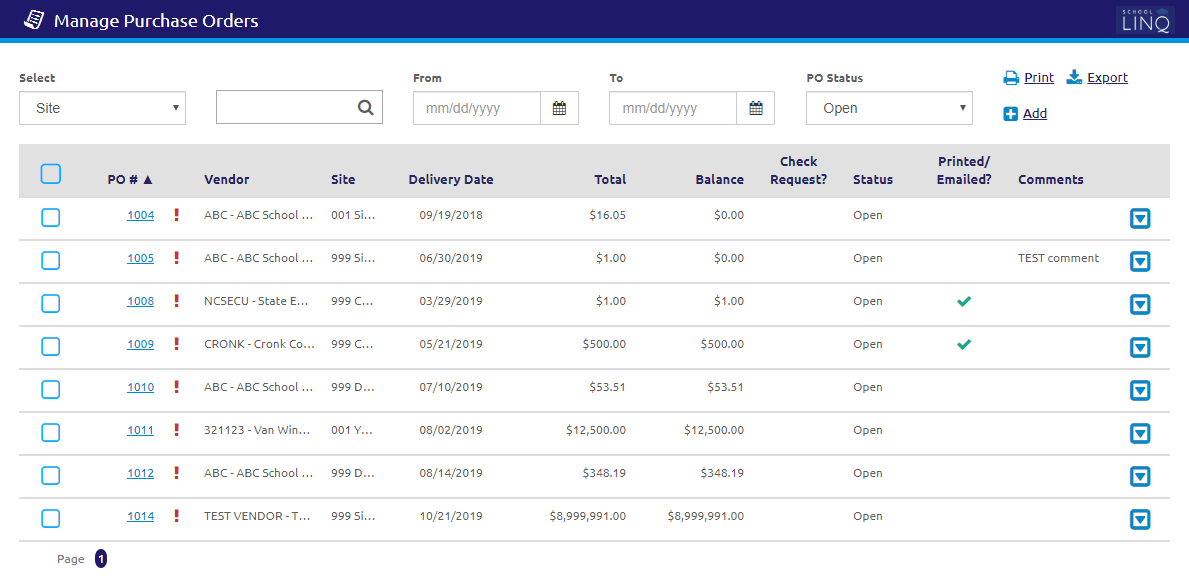
- Select an option from the Select drop-down list.
- If Site, Vendor, or Created By is selected, use the
 field to search for a PO.
 - Enter or select a date range using the Calendar feature in the From and To fields, if desired.
- Select an option from the PO Status drop-down list.
- Click the
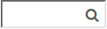
 link to generate a Purchase Order Listing Report of the POs currently displayed in the grid.
- Click the
.png) link to generate a .csv file of the POs currently displayed in the grid.
link to generate a .csv file of the POs currently displayed in the grid. - Sort the grid by clicking on any column header.
- The Printed/Emailed? column indicates whether a PO has been printed or emailed for delivery to the vendor.
- The
 icon indicates a PO with an over budget account.
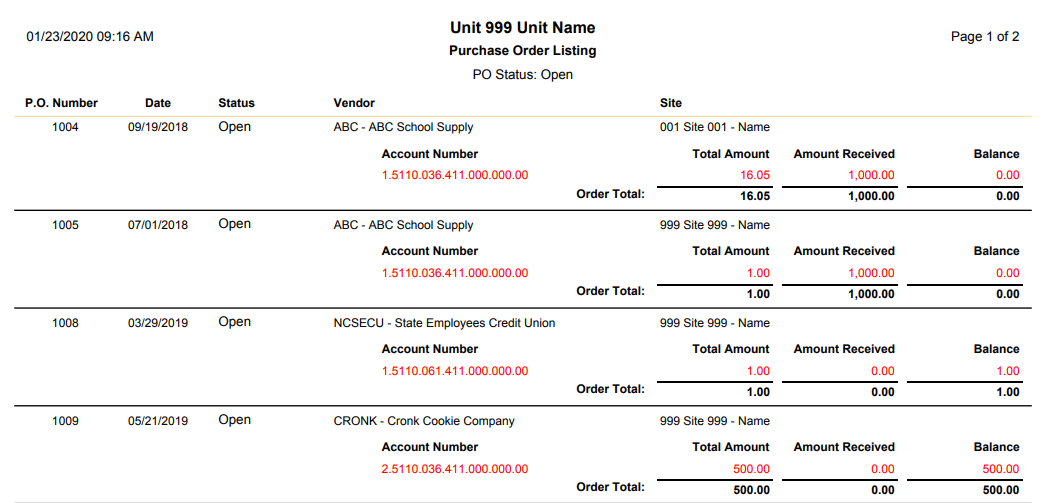
Close / Delete Purchase Orders
- Check the
 boxes for each PO you wish to close/delete, or check the box at the top of the column to select all. The
  button will display.
 - Click the button. The Close / Delete Selected Purchase Orders window will display.
- You will be able to check the Close box for open POs with invoices attached.
- You will be able to select the Delete box for open POs with no invoices attached.
- Verify that you want to close/delete the selected POs and click the
 button.
View / Edit Purchase Orders
- Click the
 icon.
icon.

- Hover over the icon to view by how much the account is over budget.
- Click the
 button to edit a PO or to see more details on the PO. The View / Edit Purchase Order form will display. Any information can be changed on an open PO with the exception of the Site.
- Click the
 link to see an audit history of changes to this PO.
 - Click the
 link to see all invoiced paid against this PO. From within the list of invoices, you can click on any invoice to see the details of that invoice.
 - Click the
 button for a preview of this PO. From here, you can select the copy of the PO to Print or Email.
- Click the
- Click the
 link to delete the PO. The Delete Purchase Order window will display.
- Click the
 button.
- Click the
Create New Purchase Order
- Click the
.png) link to add a new PO. The Create New Purchase Order form will display.
link to add a new PO. The Create New Purchase Order form will display.
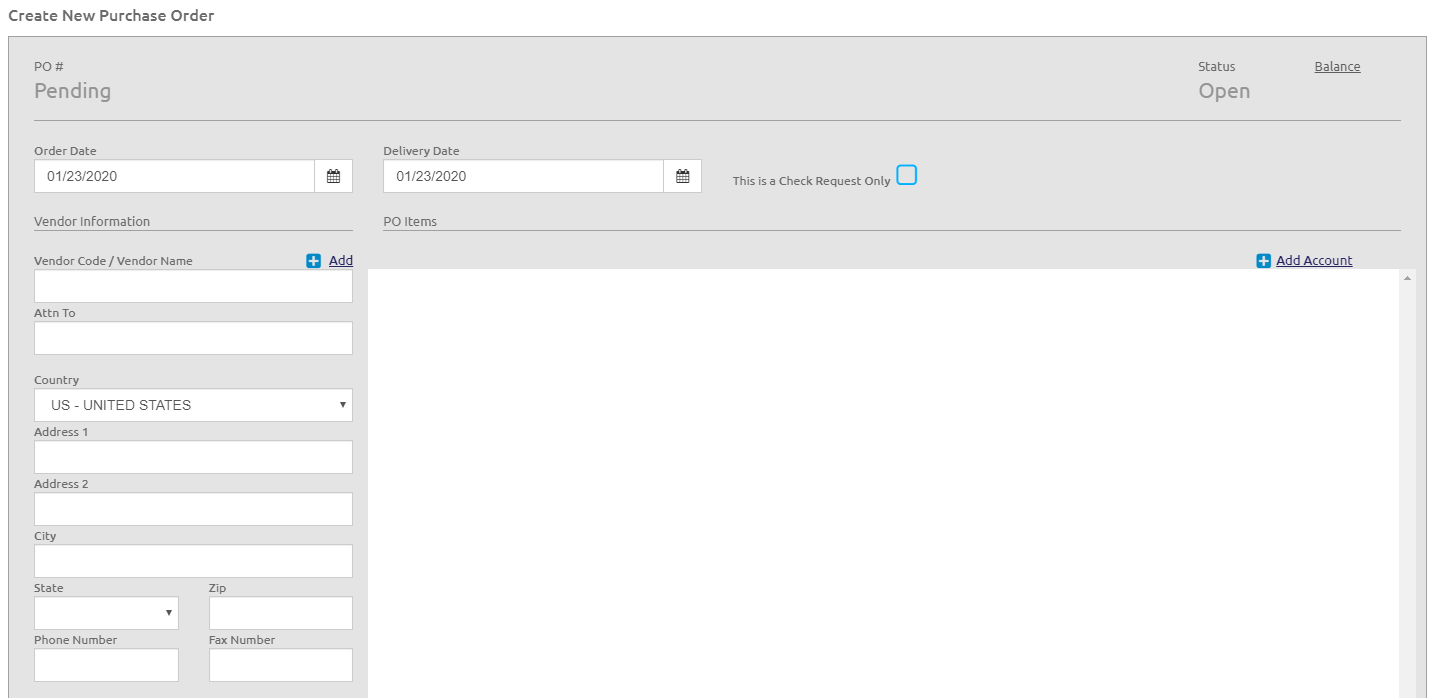
- The next PO # available will be assigned automatically. The next PO # from Purchase Order Setup in System Settings.
- Enter the Order Date using the Calendar feature.
- Enter the Delivery Date using the Calendar feature.
- Check the This is a Check Request Only box if this PO is to only notify principals and/or administrators that the PO is a request for money, and the PO should not be emailed or printed for the vendor.
Vendor Information

- Enter a Vendor Code or Vendor Name. The Attn To, Country, Address fields, Phone Number, and Fax Number fields will default from the vendor selected, but these are editable.
OR
- Click the link to add a vendor. The Add Vendor form will display.
- Enter the Vendor Code, Address information, Vendor Name, and Tax ID.
- Click the
 button.
Ship To
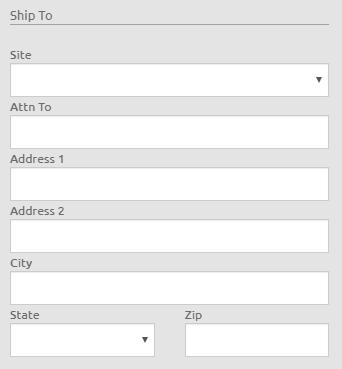
- Select the Site from the Site drop-down list.
- The Attn To and Address fields will default from the Site selected, but these are editable.
PO Items

- Click the
 link once for every account you wish to add.
 - Enter the account number in the Account # field, or click the
 icon to browse the available accounts. NOTE: If the account(s) being used on the PO are over budget, or will be over budget as a result of the PO, an Over Budget warning message will display on save.
 - The Description is read-only and based on the account number selected.
- Enter the Quantity.
- Enter the Unit related to the Quantity. This is optional.
-
Enter a Description for this item line. This is optional.
-
Enter the Unit Cost.
- Enter the item number in the Vendor Item # field. This is optional.
- The Merch field will be calculated automatically.
- Select an option from the Type drop-down list.
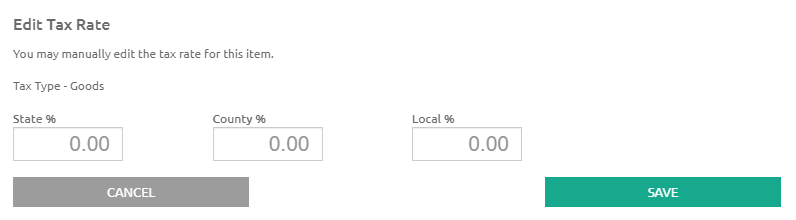
- Tax rate will default to the tax rate entered on the vendor. Click the
 icon to edit the tax rate. The Edit Tax Rate form will display.
- Enter the State %, County %, and Local %.
- Click the button.
- The Tax and Line Totals will be calculated automatically.
- Click the
 icon to delete any line or account.
 - Click the
 link to add a line for Shipping and Handling.
 - Click the
 link to add an additional to the invoice.
 - Click the link to add additional accounts to the PO.
Comments and Amount totals

- Add comments in the Comment box, if necessary.
- Subtotal is the total of all items on this PO.
-
S&H is calculated from the S&H lines on the PO.
-
Tax is calculated from all items with a tax rate.
-
Verify the Grand Total is correct for this PO.
-
Click the
button to create the PO.
©2021 | EMS LINQ, Inc.
School LINQ Help, updated 01/2021